Flex
Radio Remote Keying Without Latency
Using
your browser, navigate to priority1design.au/datasnip.html >
Download Datasnip Now. This
will put the datasnip.zip folder in your downloads folder. You
can leave
it there or move it to another convenient place. Then, extract
all from
that folder. A new folder labeled "datasnip" will be created
and the datasnip program will be in that folder. Create a
shortcut out on
the desktop for the program. When you run Datasnip you will get a
screen that
looks like:
You
will have to set the COM port using the
drop down. But, at this point, you don't know which one to
use. The
other settings shown above should be correct. Later, when you are
ready,
you can start Datasnip, set the COM port, and "start
redirection". DO NOT click on the little minus sign in the upper
righthand corner. If you do, the control screen goes away and you
can't
stop the redirection without rebooting the PC. Just leave the
Datasnip
screen somewhere convenient on the display and "stop redirection"
when you are finished. You can then exit (X) out of the program.
Next
install the Arduino IDE. To do
that, navigate to Arduino.cc > Software > downloads > Download
Arduino
IDE 1.8.13 for your system > just download (no voluntary
contribution). The file will appear in your downloads and you can
click
on it to install the IDE (integrated development environment).
You will
get an icon on the desktop:
When
you start it, you will get:
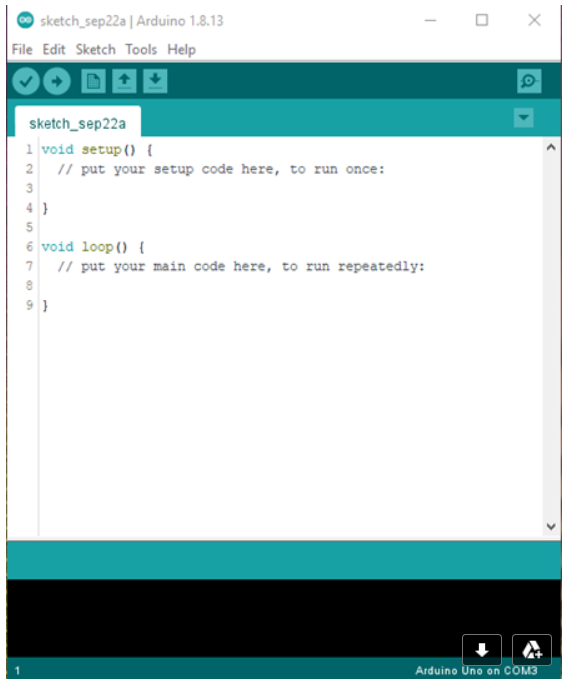
But,
yours will not show the COM port.
You
will also need a C++ sketch program for the Arduino Uno which can be
downloaded
at this site. The
Arduino must be programed with the code named:
It
will operate at speeds well above 50 wpm and includes
the prosigns used by the Flex Radio CWX program. Create
a folder called “Arduino”. Inside that
folder create another folder
called “CW_Decoder_Stripped”. Place the
sketch CW_Decoder_Stripped.ino into this folder.
Start
the Arduino IDE program. Click on “file”
and open the
CW_Decoder_Stripped sketch. Plug the
Arduino
into a USB port on your PC. Then, click on the "tools" at the
top. Go down to "port:" and select the port that the Arduino is
connected to. In the IDE click on the
check
mark at the upper lefthand corner. The
program should compile without errors.
Then, click on the arrow pointing to the right in the upper
lefthand
corner to load the sketch into the Arduino.
With
the Arduino plugged into the USB port and
into the keyer, tap the paddles and see if the LED inside the box
lights.
Start at 15 to 20 wpm. But, the speed can be cranked up slowly
from
there. If the LED is lighting, the keyer information is reaching
the
Arduino. If not, that will have to be fixed before going any
further. With the LED working, and the IDE running, click on the
little
circle in the upper right corner of the IDE screen. That will
start the
"serial monitor". Now when you key in a character with the
paddles, it should appear on the serial monitor screen. You may
need to
send a few V's to get the program to sync with the keying.
Exit
from the IDE program. Datasnap will
not work with the IDE using the COM port. Start the Datasnap
program and
tell it the COM port that the IDE was using and start the data
redirection. Start Notepad or any word processing program.
Again,
test to see if keyed in characters appear in the document as if they
were being
typed on the keyboard. If so, you are ready to try it with the
Flex
program and your rig.
Start
the Flex Radio Smart SDR program and start
CWX. Set the CW speed on the Flex a
little slower than the keyer speed so that you can begin to fill the
type ahead
buffer. Click on the “live” button and put the cursor in the CWX
data entry
box. Typing on the keyboard or sending
CW with the keyer should now put characters into the CWX type ahead
buffer. Your CW keying will be sent from
the
transmitter exactly as you key it in with the keyer and without any
latency. Of course, you can also enter
data by typing
on the keyboard. So for example, the
“backspace” key can be used to erase data that was mis-entered.
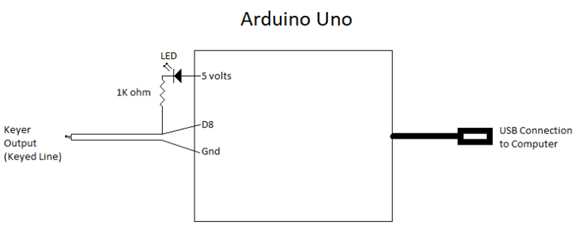
Here
is what my Arduino Uno circuit looks
like:
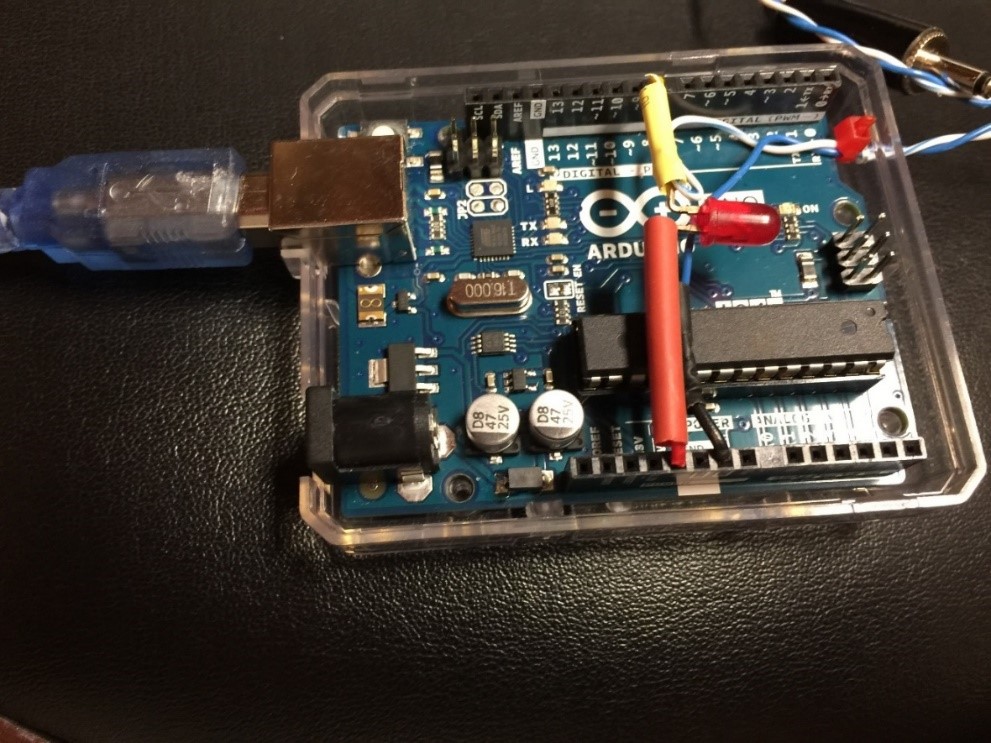
With
the connecting wires, it looks like:
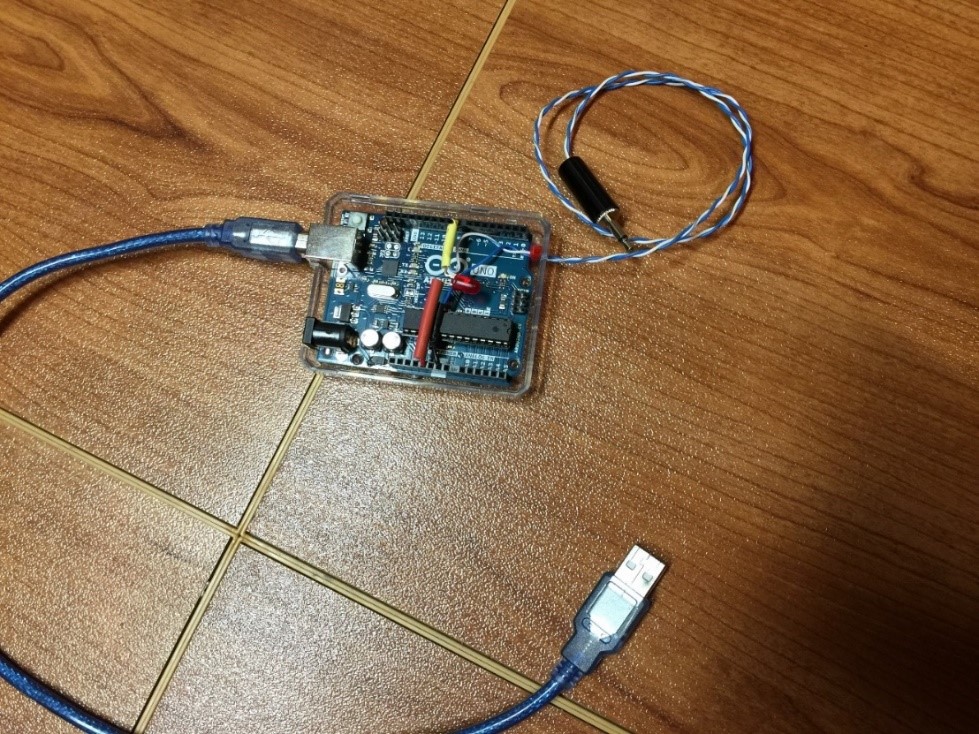
The
Arduino Uno and the other components are
mounted in a Plexiglas box purchased from Amazon.com:
“SB
Uno R3 Case Enclosure New Transparent Clear
Computer Box Compatible with Arduino UNO R3”.
The cost is less than $5.
A
simple way to add a side tone to your key or
bug is with a circuit like:
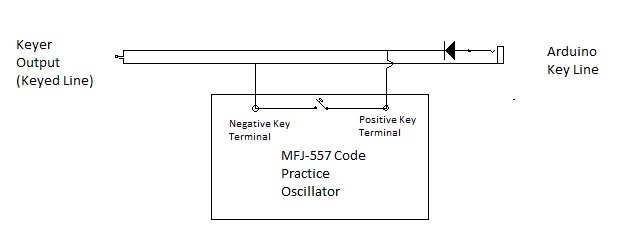
A
bug or a straight key
can be connected to the terminals on the MFJ-557 Morse code practice
oscillator
and it will generate a tone as the keying is entered.
Of course, a keyer is not required if you are
using a bug or a key.